
4 inches apart (works, but bulbs may be smaller)
Egg trays vary in cup spacing, so you “customize” by which cups you use:
For big bulbs: plant every other cup (or skip cups in a pattern)
For smaller bulbs / tighter beds: plant more cups and expect smaller heads
Step 5: Place cloves correctly (orientation matters)
Set one clove per chosen cup:
Pointy end up
Flat root end down
If a clove goes in sideways, it usually still grows, but bulbs can be misshapen.
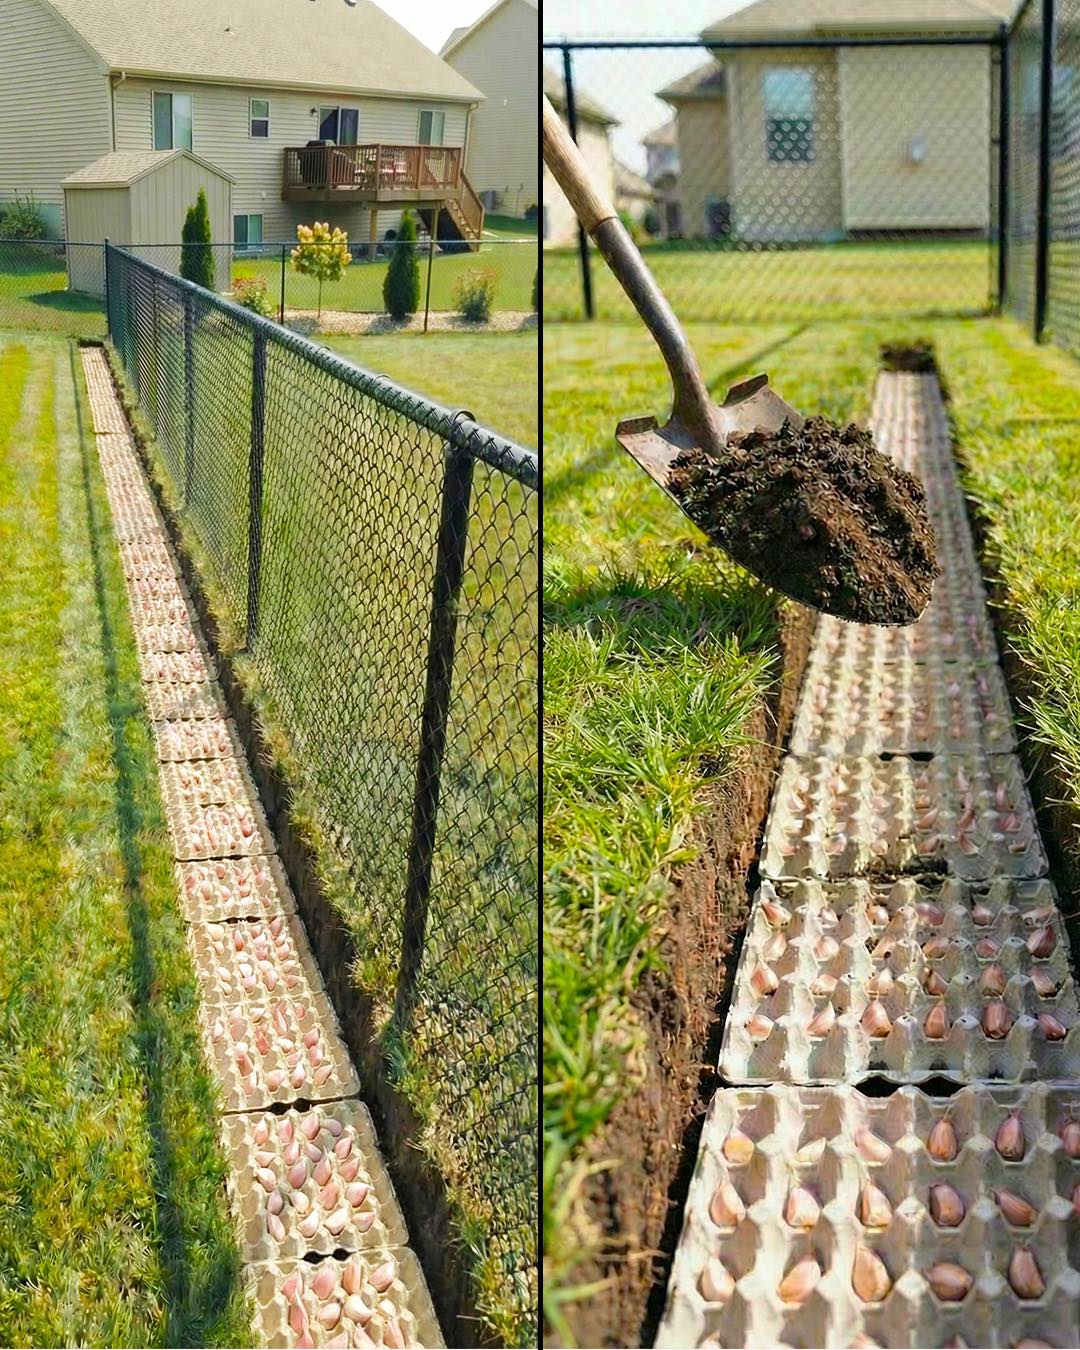
garlic cloves egg carton planting method
Step 6: Cover depth (the #1 garlic mistake)
Garlic needs to be deeper than onion sets.
Cover cloves so the top of the clove sits 1–2 inches below the soil surface
In colder climates, many gardeners aim closer to 2 inches for winter protection
How to cover with trays:
Sprinkle soil over the trays and cloves
Gently rake/pat so soil fills gaps without compacting hard
You don’t need to bury the trays under a thick layer—just enough soil to reach the proper clove depth.
Step 7: Mulch (garlic’s secret weapon)
Mulch is where garlic really separates from onions.
After planting and watering, add:
3–6 inches of straw or shredded leaves (more in very cold areas)
Mulch helps:
prevent frost heaving
suppress weeds
stabilize moisture
protect winter roots
In spring, you can pull mulch back slightly if the soil stays too wet or cold, then re-fluff it once growth is strong.
Step 8: Watering
Water well after planting to settle soil.
In fall: water only if it’s dry.
In spring: keep moisture consistent during active growth.
A good rule: about 1 inch of water per week during spring growth (rain + watering), but don’t overdo it—garlic rots in soggy soil.
As harvest approaches and leaves begin to yellow, reduce watering.
Step 9: Feeding garlic (simple and effective)
Garlic is a heavy feeder early.
Compost at planting covers a lot.
In spring, when shoots are 4–6 inches tall, top-dress with compost or a light nitrogen feed.
Repeat once more a few weeks later if plants look pale or growth is slow.
Stop heavy nitrogen once bulbs start sizing up (mid-to-late spring). Too much late nitrogen = more leaf, less bulb, poorer storage.
Weed control (why the cartons help)
Garlic doesn’t like competition and has relatively shallow roots.
Egg cartons help by:
shading soil surface to slow weed germination
locking in your spacing so weeding is fast
Still, pull weeds early—especially in spring when garlic is building the bulb.
Common problems (and fixes)
1) Small bulbs
Causes: small cloves, too much shade, overcrowding, low fertility
Fix: plant largest cloves, 6″ spacing, full sun, compost + early feeding
2) Rot
Causes: poor drainage, overwatering, planting too deep in heavy soil
Fix: raise bed, improve drainage, water less frequently but deeply
3) Frost heaving (cloves pushed up)
Cause: freeze/thaw cycles without protection
Fix: mulch 3–6″ after planting
4) Rust or leaf spotting
Cause: humidity, poor airflow
Fix: spacing, avoid overhead watering late day, remove badly affected leaves
Spring scapes (hardneck only)
Hardneck garlic sends up curly flower stalks called scapes.
Cut scapes when they curl once (usually late spring/early summer)
This redirects energy into the bulb
Bonus: scapes are delicious (pesto, stir-fry, grilling)
paper egg carton garlic garden bed
When to harvest
Garlic is ready when:
The bottom 3–4 leaves are brown
The top leaves are still partly green
Bulbs feel formed under the soil
Don’t wait until all leaves are dead—bulbs can split and won’t store well.
Harvest tip: loosen with a fork/shovel and lift gently—don’t yank by the stem.
Curing and storage (make it last)
Brush off excess dirt (don’t wash).
Cure in a dry, shaded, well-ventilated spot for 2–4 weeks.
When necks are dry and wrappers papery:
Trim roots
Trim stems (or braid softneck)
Store in a cool, dry place with airflow (mesh bags work well). Avoid sealed containers.
Inspired by this? Share the article with your friends!
